Damage System
This is a guest article written by DekaFumoDeathCult which includes strategies for players already familiar with how to play Magical Drop III. If you are new to the game, we suggest you start with our introduction instead.
Introduction
If you've made it this far, you probably already know that Magical Drop has two win conditions: crush your opponent under pressure with attack lines or race your opponent to clear 200 orbs first. The pros and cons of each strategy vary from character to character and player to player, but both routes to victory revolve around Magical Drop's chaining and damage system.
In most puzzle games that reward chaining, making a longer, stronger chain than your opponent is typically the goal. For example, in Puyo and Puzzle Fighter, damage scales exponentially to reward the planning and risk it takes to set up a long chain, so the meta becomes a balancing act between building a long chain for kill power and using small harassments to punish your opponent for doing the same.
In contrast, attacks in Magical Drop 3 scale relatively linearly, and the garbage queue caps at 8 lines. This makes a guaranteed one-shot chain on the 12 row board impossible. When you add in the ability to interrupt garbage and the time it takes to make an 8-line chain, killing someone with pressure starts to sound rather difficult, so let’s pull back the curtain to see what’s going on.
A Peek Under the Hood: The Damage System
The damage system in Magical Drop 3 can be summed up in three steps. First, the power of your clear is calculated based on the following function:

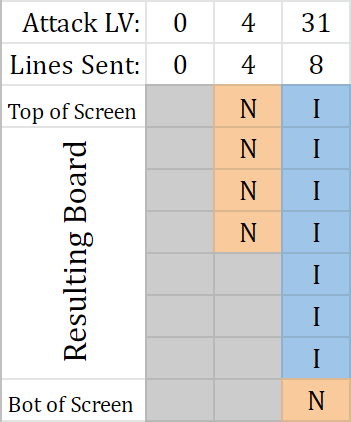
Next, the resulting attack level is plugged into one of the three attack tables:


The attack table chosen depends on the “strength” of your character:

Note that this is not a tier list. “Strength” here does not mean a character is good or bad at pressuring an opponent. For example, “Weak” Hanged Man’s color pattern makes him a high-tier pressure character while Judgement has some of the weakest pressure in the game despite her “Strong” placement.
Finally, the lines from the table are pulled from the character’s color and ice pattern and molded into the correct shape.
So where does this all come into play in terms of optimization? Well, that depends on your game plan. Let’s cover pressure first.
Burying Your Opponent: birdup Lied (Kinda)
Earlier I mentioned Puyo when talking about puzzle games rewarding chain length. In the original Puyo Puyo, much like Magical Drop, there no was way to truly cancel incoming damage. The meta quickly developed into a race to see who could bury their opponent in a single, uncounterable chain faster. With some experimenting, you’ll soon realize the magic number is 5. The reason is:

This Puyo Puyo 5 Chain…

…becomes this garbage (69)
That is to say, if you launch a 5-chain, your opponent is guaranteed to lose.
Three years later, with the addition of damage offsetting in Puyo Puyo Tsu, the meta evolved again. The damage calculation didn’t change much; a 5-chain would still instantly kill your opponent if they’re forced to receive the damage, but now there was a reason to build past the 5-chain mark. If you hear your opponent set off their 5-chain, you can now use the time it takes to resolve to add an additional link to your own chain before firing back. With Puyo’s exponential damage growth this means disaster for your opponent because:

This 6 Chain…
…sends this garbage (123)
Meaning for a paltry 4 extra puyo, you’ve countered your opponent’s entire attack and also sent them a nice little 9-line gift of your own.

The garbage sent to your opponent after offsetting their 5-chain with a 6-chain.
For comparison, on a Strong, “High-Tier” character like Tower, the only difference between a 5 and 6 chain could be orb quality:

The result of 15 orb 5-Chain…

…vs result of 18 orb 6-Chain
And attacking with anything greater than an 8-Chain will never exceed these frozen ramparts:

Was it an 8-Chain? Or a 28-Chain? We’ll never know.
Well then, if big chains aren’t the answer, what is? Let's take another peek back at those attack tables. For strong characters, the difference in lines sent between an attack level of 0 and an attack level of 4 is the same as the difference between 4 and 31.
If you also recall our damage formula, you’ll quickly realize that reaching attack level 4 requires only the most basic combo: a 6-orb 2-chain. This is the logic behind that rule of thumb you have probably heard; “2-chain for pressure” or “2-chain sends four lines.” There are two main reasons you want to minimize chain length when sending pressure. The first, it simply takes less time to send two 2-chains than it does to make a single 7-chain (the minimum required to guarantee 8 lines).


Above you can see the 2-chains are almost 50% faster than the 7-chain.
The second reason is a bit more complicated as it ties in to the most iconic aspect of Magical Drop; the attack shapes. In a game like Puyo, falling garbage will have some variance, but generally speaking it covers the field in even layers.

A simple 3 chain…
…sends 16 garbage…

…so does the next…

…and the next.
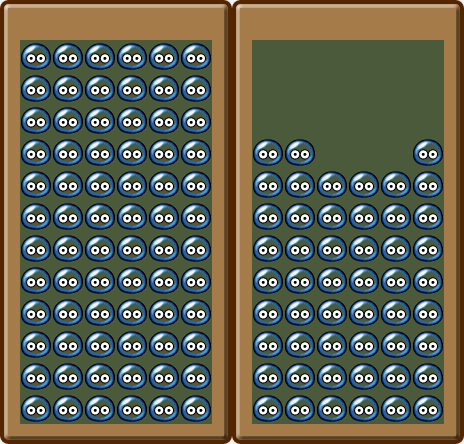
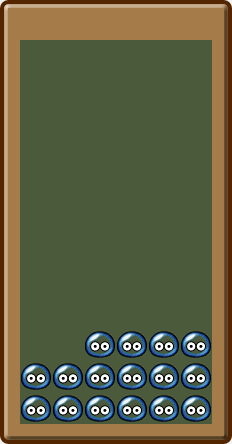
Magical Drop instead feeds lines that will push everything else on your board down:

A single chain sends 4 lines…

…then the next, four more lines…

…and the last, four more lines.
Take note of how the damage becomes stretched as the attack shape pushes the columns down at different rates.
This gets compounded when you start to look deeper into the character’s damage shapes. For every character, the bottom two lines of their attack are full, 7 orb lines. Some characters have more. Most have 4-5, but the weak table characters have as many as 7 or 8. As you try to bury your opponent, sending more lines with less material is the fastest way to victory. He may not be the best character to pressure your opponent to death, but Magician, illustrates this very well.

Two sets of 4 lines…

…vs one set of 8 lines.
Any attempt to route your way down these two attacks will show the strength of sending fewer orbs. To clear the 8 line set, you can simply offload the top row into column 1 or 7 to rapidly downstack your entire board. With good mash moving, you can even do it fast enough to prevent additional garbage from disrupting the straight lines. The other board requires shuffling the yellow orbs out of the way before you can start matching the lines below, but fewer full lines will leave stranded orbs that drastically impede progress. All this while dealing with any other pressure your opponent may be sending you, and more importantly losing tempo on quota.
Optimizing for Quota:
Unfortunately, you can’t just pick Father Strength and smash your way to victory. Attempting to bully your way through story mode with 2-chain spam will run you into a wall when you reach the warp CPUs, and the competitive scene keeps things interesting by mandating mirror matches, so you can’t rely on character strength alone. Eventually, you’ll reach a point where you have to deal with our other win condition, quota.
As mentioned earlier, controlling the number and shape of the orbs you send segues perfectly into optimizing for a quota race. This is where the tactics for Magical Drop really start to get interesting. The goal, at face value, is very simple, clear 200 orbs before your opponent, but it’s also somewhat deceiving. You would think that “racing to quota” would be about speed, but that’s not necessarily the case.
Some footage from my first victory over Level-8 Tower. You can clearly see speed isn’t everything.
Maximizing mechanical speed and minimizing time between clears will definitely improve your results, but let’s not forget that we’re playing a two player game. Going fast is all fine and good, but you can also play smart to slow down your opponent. Comparing Magician’s 2x4 vs 8-line attacks from earlier is an obvious example of garbage that will slow your opponent down, but High Priestess demonstrates another:

The garbage you sent with a 14 orb 3-chain…

…vs the garbage you get back.
As a fellow holder of the “flat color lines” pattern, High Priestess is a mixed bag on kill power vs quota race. Her attack shape looks very aggressive with its column 2 and 6 spires, but it’s deceptively easy to manage with a bit of practice. Getting large clears in quick succession isn’t uncommon either. What’s really interesting though, is how few orbs her lowest damage attacks send. You would figure that when racing to quota, if sending fewer orbs is better, then the best play is to send no orbs at all, but that’s not the case. Blocking your opponent from self-feeding lines is critical to not falling behind in many matchups. The neutral patterns are typically faster and easier to clear than garbage and frequently provide big quota swings through power orbs. To optimize your attacks, you have to balance how many orbs you clear with how many you’re going to send. A big single or double clear will almost always erase more orbs than you send, whereas a longer chain will typically send more than you cleared. We call this principle Quota Advantage.

A wonderful table by Maruta displaying Quota Advantage for High Priestess.
From a numbers standpoint, quota advantage is always beneficial, but it isn’t always optimal. Being too paranoid about sending “bad” or “too much” garbage isn’t worth stopping to think or shuffling orbs you could be matching. They key is finding a balance between the three slices of the quota race pie: clear speed, damage, and survival. Playing a match of Fool really demonstrates how this balance can change over the course of a match.

Good luck trying to crush someone with this garbage, pun intended.
It’s not worth trying to pressure someone with Fool. You have to maintain quota advantage if you want to win. Any garbage you send can be cleared faster and more efficiently than the chain that sent it. In fact, Fool’s pattern is so easy to clear, that you want to force your opponent to pull their own lines. That way the attacks you do accidently send are obscured by the marginally slower neutral pattern and your opponent may get hasty as they try to dig down to the free line clears.
Your gameplan during the 30 second race-to-quota as Fool derives from quota advantage, but that doesn’t make it static. Proximity to zero plays a major role as you judge the value of sending garbage, and the round can be loosely broken into three parts. At the beginning of the round, you need buffer material. Pulling up a handful of extra lines gives you orbs to clear as you wait for Fool’s pattern to roll in. Maintaining quota advantage here pays dividends, especially if you can enter midgame first. After cutting your way through a board or so of neutral pattern, you’ll eventually hit Fool’s infamous zigzags. Once you get into the garbage pretty much every match will send a line to your opponent, so your new plan is pure speed. Large matches and short chains are still the priority to boost the chances of sending alternating lines of ice, but once the floodgates are open, there’s no turning back. After a dozen or so more clears, start keeping a very close watch on how many orbs you have left. When your quota drops below 60, your strategy switches again. Fill your board to the 9-line mark and go for your fastest All Clear. Quota advantage doesn’t matter anymore because you can end the round before your opponent can accept garbage, and if you’re ahead of your opponent at this point, it’s virtually impossible for them to catch up if you play it right.
Different characters will have strategies that revolve around quota advantage as well. On an upper-mid-tier like High Priestess, you may focus on 6-orb 2-chains for the first half of the round before switching to quota if your opponent proves they’re capable of surviving. Or if you spot a rainbow orb on Tower, you may skip pressure altogether and abuse orb duplication because you know it’s going to be a quota race. If someone keeps beating you to quota, it might be worth looking at quota advantage to explain why.
Special Thanks
I’d like to give a few brief shout outs. First, to Zircean for programming the damage calculator I used to generate almost every Magical Drop screenshot I used here. Second, birdup for hosting brackets, organizing events that grow the community, and for constructing https://www.playmagicaldrop.com/ which inspired me to write about this game in the first place. Third, without Maruta’s efforts to catalog all of the inner workings of Magical Drop 3, none of this would have been possible. And finally, everyone in the community who makes this game a blast to play.